
Understanding how to replace a window involves several steps. First, check the window frame for damage. If the frame is in good condition, replacement windows can be an option. Window replacement can enhance energy efficiency and improve the appearance of your home. You can install replacement windows using the existing frame, which saves time and money. Sometimes, only the sash needs replacing, and sash replacement kits can help with this. If you notice damage to the existing window or frames, consider vinyl replacement windows for their durability. A professional window installer can guide you in choosing between full frame replacement windows or just replacing the window pane. New windows can significantly increase your home’s value and comfort.
Choosing the Right Replacement Window
Replacing your windows can be a daunting task. Here are eight tips to help you choose the right replacement window for your home.
Measure Accurately
Accurate measurements are crucial for a good fit. Use a sharp utility knife to trim away any old paint or debris. Measure the window opening at three points to find the smallest measurement.
Consider the Window Frame
A new window frame can improve insulation and aesthetics. Choose between vinyl window and new wood frames. Ensure the frame is slightly smaller than the window opening for a snug fit.
Select the Right Glass
Safety glass options like tempered glass are essential. Modern windows often feature energy-saving glass. This can help reduce your energy bills and improve home comfort.
Decide on the Type of Window
Full frame windows replace the entire window, including the frame. Pocket windows fit into the existing frame and are easier to install. Choose based on your needs and the condition of your old window frame.
Check for Lead Paint
Older homes may have lead paint on window frames. Use a putty knife to test the paint. If lead is present, take proper safety measures or consult a professional.
Think About Insulation
Proper insulation is key to energy efficiency. Use fiberglass insulation around the window frame. Apply flashing tape to seal gaps and prevent drafts.
Look at Hardware and Sashes
New hardware can improve functionality. Sash kits include new sash weights and jamb liners. These make old windows operate smoothly and look new.
Don’t Forget Exterior and Interior Trim
Exterior trim and interior stops complete the look of your new window. These pieces cover gaps and provide a finished appearance. Visit a hardware store for trim that matches your home’s style.
Installing a Replacement Window
Replacing windows in an old house can improve energy efficiency and update the home’s appearance. Follow this 8-step installation guide to ensure a proper fit and secure installation. By following these steps, you can successfully install new construction windows or replace old wooden windows. This guide helps ensure a secure fit and improved performance for your new windows.
Step 1: Prepare the Work Area
Tools and materials needed: Screwdriver, utility knife, pry bar, drop cloth
Clear the area around the window. Place a drop cloth to catch debris. Remove curtains, blinds, and any obstructions. Make sure you have all the necessary tools and materials. Organize the tools within reach for easy access. Check the work area for any hazards. Ensure good lighting in the area. Confirm that the drop cloth covers the entire work area to catch all debris.
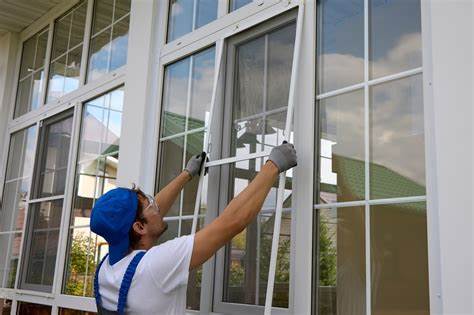
Step 2: Remove the Old Window
Tools and materials needed: Screwdriver, utility knife, pry bar, hammer
Carefully remove the window trim and parting stops. Use a utility knife to cut through the paint and sealant. Pry off the stops gently to avoid damaging the existing window frames. Take out the old sash, including the lower sash and upper sash. Keep the removed parts aside for proper disposal. Inspect the removed window for any reusable parts. Handle the glass with care to avoid breakage. Ensure you wear gloves to protect your hands.
Step 3: Clean and Inspect the Window Opening
Tools and materials needed: Vacuum, brush, wood filler, sandpaper
Clean the window opening thoroughly. Remove any dust and debris using a vacuum and brush. Inspect the frame for damage or rot. Use wood filler to repair any damaged areas and sand it smooth. Make sure the surface is even for the new window. Check for any hidden damages that need fixing. Allow the wood filler to dry completely. Sand the filled areas until smooth to ensure a good fit for the new window.
Step 4: Check the Fit of the New Window
Tools and materials needed: Measuring tape, level
Measure the window opening to ensure the new window insert will fit properly. Place the new window in the opening to check for any adjustments needed. Ensure the window is level and square. Make any necessary adjustments to the opening. Verify that all sides of the window are flush with the frame. Mark any areas that require trimming. Test the window opening with the new window again after adjustments. Confirm that the window can be secured without gaps.
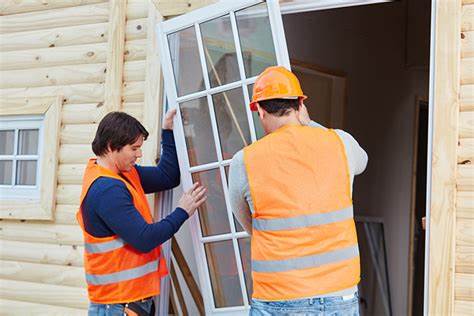
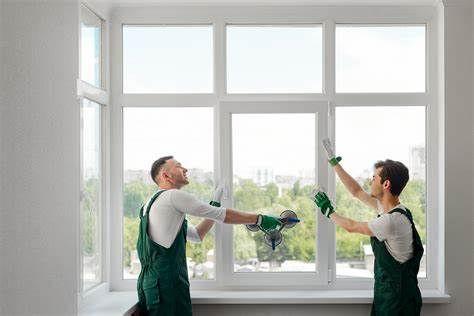
Step 5: Install the Window Insert
Tools and materials needed: Screws, screwdriver, shims, level
Position the window insert into the opening. Use shims to ensure it fits tightly and is level. Secure the window with screws through the side jambs. Check that the window is tight and operates smoothly. Ensure the screws are evenly spaced. Avoid overtightening to prevent frame damage. Verify the window’s movement after installation. Adjust shims if needed to maintain level and alignment.
Step 6: Seal and Insulate the Window
Tools and materials needed: Caulk, caulk gun, insulation foam
Apply a bead of caulk around the edges of the window. Use insulation foam to fill any gaps between the window insert and the frame. Ensure all movable parts are sealed properly to prevent drafts. Smooth the caulk for a neat finish. Allow the foam to expand and fill the gaps completely. Trim any excess foam after it cures. Double-check for any missed spots to ensure complete sealing.
Step 7: Replace Trim and Finish
Tools and materials needed: Trim pieces, nails, hammer, paint
Reattach the window trim and any parting stops removed earlier. Secure the trim with nails, making sure it fits snugly. Paint or stain the trim to match the rest of the window. Let the paint dry completely before moving on. Ensure the trim is aligned correctly before nailing. Fill any nail holes with wood filler. Sand the filled holes smooth before painting. Apply a second coat of paint if needed for a uniform finish.
Step 8: Clean Up and Inspect the Installation
Tools and materials needed: Cleaning supplies, glass cleaner, inspection checklist
Clean the new glass and the surrounding area. Remove any tools and materials from the work area. Inspect the installation to ensure everything is secure and functioning correctly. Check that the window operates smoothly and is properly sealed. Make sure the work area is free of debris. Dispose of any waste materials properly. Verify all seals and insulation are intact. Conduct a final operation test of the window.
Choosing a Reputable Window Replacement Company
Selecting the right window replacement company is crucial. There are several qualities to consider. This guide will help you make an informed decision.
Experience and Expertise
A reputable company has years of experience. They understand how to handle side jambs and sash replacement kits. They use the right tools, such as a putty knife. Their expertise ensures proper installation of exterior trim and flashing tape. They know how to deal with old windows and lower sashes. Experienced companies also stay updated with the latest industry standards.
Quality of Products
Quality materials are essential for window replacement. Look for companies that use durable sash replacement kits. They should also provide strong exterior trim. Quality flashing tape helps seal the windows properly. Good products ensure your new windows last long. Companies that use top-grade materials offer better insulation and durability.
Customer Reviews and Testimonials
Positive customer reviews indicate a reliable company. Reviews often mention if the company efficiently replaced old windows. Customers will note if the installers handled sash weights well. Look for feedback on the company’s handling of old sashes and storm windows. Testimonials can give you insight into the company’s reputation. Satisfied customers often highlight the professionalism and efficiency of the service.
Professionalism and Communication
Professional companies communicate clearly. They explain the process of dealing with side jambs and blind stops. They will inform you about the window sash and pocket window options. Clear communication ensures you understand every step. Professionalism reflects in their punctuality and neatness. Good communication helps prevent misunderstandings and ensures a smooth project flow.
Comprehensive Services
A good company offers comprehensive services. They handle everything from the lower sash to the top sash. They can replace large windows and maintain the original window’s style. Their services should include storm windows and flashing tape application. Comprehensive services mean fewer hassles for you. They should also offer maintenance tips to keep your windows in good condition.
Fair Pricing
Fair pricing is crucial when choosing a company. They should provide a detailed estimate. The estimate should cover side jambs, window sashes, and exterior trim. They should also include costs for pocket windows and large windows. Fair pricing helps you stay within budget. Transparent pricing ensures there are no hidden fees or unexpected costs.
Warranty and Guarantees
A reputable company offers warranties. They guarantee their work on side jambs and sash replacement kits. They also provide warranties on flashing tape and storm windows. A good warranty gives you peace of mind. It shows the company stands behind its work. Warranties often cover both the materials and the workmanship.
Proper Licensing and Insurance
Proper licensing and insurance are vital. A licensed company knows the building codes. Insurance protects you from damages during installation. They handle issues with old windows and lower sashes. Licensing and insurance ensure the company operates legally and safely. Insured companies also provide coverage for any potential accidents on your property.
DIY vs. Professional Installation
These points cover the advantages and disadvantages of DIY versus professional installation, focusing on various aspects such as cost, control, quality, safety, and convenience.
Pros of DIY Installation
- Cost Savings: DIY installation saves money. You do not pay for labor costs. You only pay for materials and tools. Many people find this to be budget-friendly. Saving money is a big benefit.
- Learning Experience: DIY installation teaches new skills. You learn about tools and materials. This can be a valuable experience. Learning how to install windows can be useful for future projects. It also boosts your confidence.
- Control Over the Project: DIY gives you full control. You decide the schedule. You choose the materials and techniques. This flexibility allows you to work at your own pace. Control over the project is satisfying.
- Personal Satisfaction: Completing a DIY project feels good. You can take pride in your work. Seeing the finished project gives a sense of achievement. Personal satisfaction is a big motivator. This can encourage more DIY projects.
- Customization: DIY allows for customization. You can make changes as you go. You are free to try new ideas. This is great for unique or creative projects. Customization makes the project truly your own.
Cons of DIY Installation
- Time-Consuming: DIY projects take a lot of time. You have to plan, purchase materials, and execute the work. This can be a long process. Balancing DIY projects with other responsibilities can be challenging. Time management becomes crucial.
- Skill Level Requirement: DIY installation requires skills. Not everyone has the necessary knowledge. Mistakes can happen easily. Fixing mistakes can be costly and time-consuming. Lack of skills can lead to poor results.
- Safety Risks: DIY projects have safety risks. Using tools incorrectly can cause injuries. Lifting heavy materials can be dangerous. Safety equipment is necessary but sometimes neglected. Safety risks are a significant concern.
- Quality of Work: Professional installers have experience. DIY projects may lack this level of quality. Improper installation can cause issues later. This might lead to additional repairs. The quality of work can suffer in DIY projects.
- Limited Tools and Equipment: Professionals have specialized tools. DIY enthusiasts may lack these tools. Buying or renting tools can be expensive. Using the wrong tools can cause problems. Limited tools and equipment can hinder progress.
- Unforeseen Issues: DIY projects can uncover hidden problems. These issues can be complex. Solving them requires expertise. Unforeseen issues can delay the project. They can also increase costs.
- Weather Dependence: DIY projects are affected by weather. Bad weather can halt progress. Rain, snow, or extreme heat can cause delays. This is especially true for outdoor projects. Weather dependence can be frustrating.
- Legal and Code Compliance: DIY projects must meet local codes. Understanding these regulations is essential. Failure to comply can lead to fines or redo the work. Legal compliance requires careful planning. This can be a complicated aspect of DIY projects.
Benefits of Professional Installation

- Expertise: Professionals have experience and training. They know how to handle complex installations. Their expertise ensures a high-quality job.
- Efficiency: Professionals work quickly. They have the right tools and knowledge. This efficiency saves you time and effort.
- Safety: Professional installers follow safety protocols. They use the right equipment. This reduces the risk of accidents.
- Warranty: Many professionals offer warranties. This covers repairs if something goes wrong. A warranty provides peace of mind.
- Code Compliance: Professionals understand local building codes. They ensure the installation meets all regulations. This avoids legal issues.
- Proper Tools: Professionals have specialized tools. They can handle any installation challenge. Proper tools lead to better results.
- Problem-Solving: Professionals can identify and fix issues. They have the skills to solve unforeseen problems. This ensures a smooth installation process.
- High-Quality Materials: Professionals often have access to better materials. They can source high-quality products. This enhances the durability of the installation.
- Increased Home Value: Professional installations can increase home value. Quality work appeals to buyers. This can be a good investment.
- Convenience: Hiring professionals is convenient. You do not have to worry about the details. They handle everything, saving you time and stress.
In Summary
Whether you choose to embark on a DIY window replacement project or opt for professional installation, the decision ultimately depends on your skills, time, budget, and comfort level. DIY can be rewarding and cost-effective for those with the necessary expertise and tools, while professional installation offers peace of mind, efficiency, and guaranteed quality. Whichever route you choose, replacing your windows is a valuable investment that can enhance your home’s energy efficiency, aesthetics, and overall value. By carefully considering the pros and cons of each approach and following the guidelines outlined in this article, you can ensure a successful window replacement that will benefit your home for years to come.